If you’re looking for the best way to accomplish a great seamless butt weld, our team of pro welders has spent days, if not years on the job using welding applications and we asked them to help us figure out which process is the best for a seamless butt weld.
 They did it, but best of all with the non-pro or beginner welder in mind. So, if you are pretty new to welding or just want a second opinion, let’s consider what the big boys have to say.
Butt welding is incredibly useful and simple when welding joints. It may not be the strongest, however it is probably the easiest and most convenient.
No single welding process is absolutely better than another as each process has specific characteristics that should be matched to the welding application. Before choosing the type of welding to use, one must consider:
-
-
- Material to be welded
- Joint and position
- Thickness of the metal to weld
- Quality of the weld
- Welding environment
- Safety
- Skill level
- Consumables and equipment
-
Both MIG and TIG can be used for butt welding. Both types of welding applications are good because of their inherent capacity to connect pieces of metal.
What Is A Butt Weld?
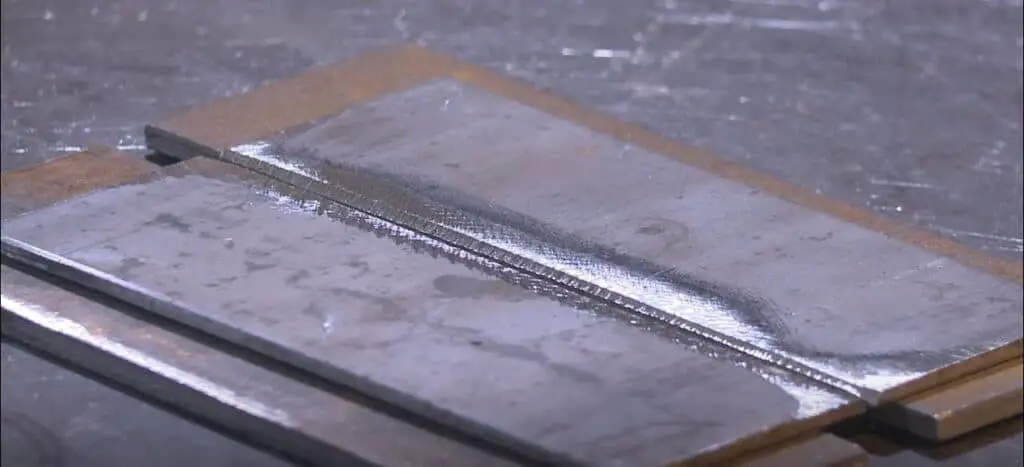
The first thing to consider is what exactly is a buttweld? This is one of the simplest designs for a weld joint. The joint is created by placing two pieces of metal one end to the other or end-to-end.
Then welding is performed along the join of the surfaces that meet one another. The welding can be accomplished by heating the two pieces of metal or by applying pressure. In some cases, both are done.
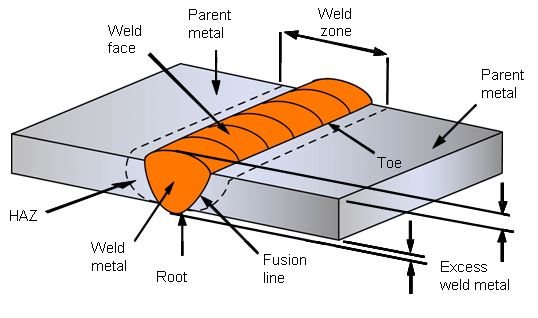
A distinguishing aspect of a butt weld is that the two pieces of metal being joined will be on the same plane, and the metal of the weld will also remain within the plane of the two surfaces. These two pieces will be parallel, they will not overlap.
This type of welding application is used to attach pipes, valves, fittings, flanges, and more.
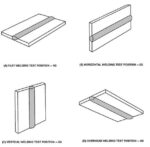
Butt Weld Joints
There are quite a number of butt weld joints and they are named mostly for their shape. These include:
-
-
- Single V and double V groove
- Single bevel and double bevel groove
- Single U and double U
- Single and double J joints
- Square butt joints
- Flare welds
-
and various combinations of these. In all of these cases, the butt weld will always be performed end-to-end.
The Advantages and Disadvantages
Butt welds do offer several advantages such as:
-
-
- A complete fusion that offers high strength
- Strong connections that are leak-proof
- Control of distortion
- Simple to machine
- Allow for easy inspection
- Lengthy service life
-
A few disadvantages include:
-
-
- The geometry of the welding is limiting
- Backing may be necessary
- Sensitivity to surface conditions
-
Butt Welding
Butt welding is the simplest method for you to use when joining together two elements or pieces of metal. Normally these two elements will be pipes or pipe fittings, perhaps sheet metal, and will have the same thickness and diameter. The surfaces of the two elements will be heated until they fuse thanks to their contact with a heating element.
Upon removal of the heating instrument, the surfaces are pushed together, and they will form the weld.
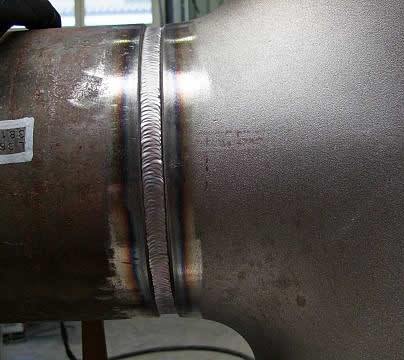
Butt welding can also be accomplished by creating the weld bead. Once the pieces of pipe or metal have been cleaned and prepared for the joint, clamps should be placed to hold the pieces in place end-to-end.
-
-
- You can begin by placing several tack welds on the side of the pipe exposed.
- Once the tacks are in place, remove the clamps and rotate the pipe.
- Reset the clamps and apply one or two tacks to the pipe on the other side where there are none.
- Once you have applied four tacks around the circumference, you can proceed to complete the bead around the entire circumference of the pipe.
- When the weld bead has cooled you can grind the weld to uniformity with the pipe. It should appear as a continuous piece of piping with no seam evident.
-
Seamless or Welded Piping for Butt Welding?
Both types of piping manufacturing have existed for decades. A welded pipe will see a piece of sheet metal introduced into a rolling machine to be curled and form a cylinder. No fusion metals are utilized to create the seam and the weld seam is not visible or felt.
Thanks to advancements in technology, a welded pipe is now less prone to corrosion than in the past. This type of piping will be less expensive.
Seamless piping will instead use a solid cylinder of metal known as a billet. While the billets are still hot, they are pierced in the center using a mandrel. They are then stretched and rolled to form the hollow billet.
These billets are generally worked until they reach the length, thickness and diameter needed for a specific application. Heat treatment afterward is not required because the billet will harden as it is produced.
A Preliminary “To-Do” List Before Butt Welding
In order to butt weld effectively, one should have proper training in order to ensure the success the weld as well as safety in the workplace. Here are some things to check before you begin to weld:
1.) The temperature of the environment where you are welding. It should sit between 5°C and 40°C for the best conditions.
2.) Inspect carefully the pieces you wish to weld together. Are they the same dimension and is there any excess ovality if they are pipes? Pipes and fittings to be welded together must share the same diameter and thickness.
3.) Check out the temperature of your heating element, preferably with a contact thermometer that is calibrated. You should measure this approximately ten minutes after the indicated rated temperature is reached. In this way, you give the element the time to heat up completely both in its surface and its depth. Fusion temperatures should reach heating of approximately between 200°C and 220°C.
4.) Check that your welder is functioning correctly.
5.) Check the heating element’s surface and clean it if necessary, with a cloth that is lint-free or with a paper towel.
6.) Control to see that the welding unit’s jaw clamps are working properly. They must be able to guarantee that the two pieces you want to weld are aligned correctly. The surfaces that make contact must be absolutely parallel.
7.) Control to make sure that both the gauge and timer are working correctly with efficient measuring.
How to Prepare to Butt Weld
In order to guarantee the success of your butt weld, there are some basic preparations to enact before you actually begin to weld.
1.) Clean the surfaces of the parts to be welded.
Before you even position the pieces, you need to remove any and all bits of oil, grease, dirt, dust, or anything else that could compromise your weld. This should be done to both the external and internal surfaces.
Always use a cloth that is lint-free, and it should be soaked with the correct cleaning detergent. It is better to use cleaning products that have been recommended by experts for this process. A few examples will be isopropyl alcohol, chlorothene, ethyl alcohol or trichloroethane.
2.) Clamp the ends of the two pieces together.
The two surfaces to be welded must be correctly clamped so that the axial misalignment is not superior to ten percent of the thickness.
3.) Edges should be planed.
This is very important and should take place immediately before welding. In order to ensure that the pieces have the correct flatness and parallelism, you need to eliminate any formation of oxide film.
The two surfaces to be joined should be planed. Once you do this, join the two surfaces and make sure that clearance between the two is not superior to 0.5mm.
Shavings will form on both of the surfaces and must be removed from the inside of the surface with a brush or lint-free cloth.
Once you have planed the surfaces, they should not be touched in any way to avoid possible contamination. For this reason, it is a good idea to proceed to welding immediately.
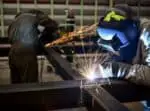
Butt Welding Using a TIG
1. Metal pieces should be fitted together flush and as tight as possible.
2. Both sides should be clean. Several tack welds are placed to keep the metal in position.
3. The join can now be welded by completing the bead with tacks on a rounded pipe surface or by pushing a metal pool that is consistent along the entire length of the join.
4. After the weld cools, sand the weld to match the pipe surface.
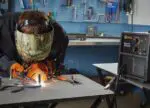
Butt welding Using a MIG
1. The two pieces of metal are joined but leave a 1mm gap. The gap will allow the MIG wire a place to melt and will connect the two pieces.
2. Make several tack welds along the join.
3. After a couple of tacks, cool the area with compressed air that is not too close as it will make a hot weld porous.
4. MIG welds require grinding down do appear seamless.
See also: Best Budget Gasless MIG Welder
TIG or MIG?
| TIG | MIG |
| Pros: No spatter | Pros: One-handed operation |
| Malleable, workable weld | Direct and shoot |
| Faster weld | |
| sanding | Cons: weld will be hardened |
| Cons: two handed operation | Produces spatter |
| Grinding necessary |
Procedure for Butt Welding with Heating and Pressure
1.) Preheating and contact.
The two edges that need to be welded should be paced against the heating element to create an internal and external lip that is uniform.
Pressure values should be supplied in the manufacturer’s information tables. This is because not only thickness and diameter are to be considered but also the thrust cylinder in your welding machine.
2.) Heating.
After the lip has been formed, pressure will be lowered to permit to the material to heat through its entire depth in a uniform manner. This will generally be ten percent lower than the preheating and contact value.
3.) Remove the welding heating element.
This must be accomplished as quickly as possible. The pipe edges must be detached from the heating element but without damaging the surfaces which have been softened. The two softened edges must be joined together in contact.
4.) Jointing, Welding, and Cooling.
Once the two edges are in contact, the pressure is increased progressively to the necessary value. Welding pressure must be maintained until the welding is completed. When the welding is completed, the contact pressure is removed.
Checking the Welded Butt Weld
You will want to check the quality of your butt weld. Initially you can begin with a visual inspection to ascertain the following factors:
1. Is the weld bead uniform around the entire joint circumference?
2. Is the center notch of the bead above the diameter outside of the two welded parts?
3. Is there porosity or evidence of dust or other contamination?
4. Are there indications of breakup of the surface?
5. Does the weld bead have a finish that is reflective? This is an indication of overheating.
6. Is the misalignment of the welded parts greater than ten percent of their thickness?
Common Defects in Butt Welding
1.) The weld bead shows an irregular path around the weld circumference. This implies that the ends were not prepared correctly before welding and the heat distribution was uneven as a result.
2.) The weld bead appears reduced in size. The welding parameters of time, temperature and pressure were not adjusted correctly.
3.) The center notch is too deep. Here the pressure or temperature values were too low.
4.) Inclusions or contamination in the weld bead. The ends were not sufficiently cleaned before welding.
5.) The weld bead is porous. The humidity was too high in the location where the welding took place.
6.) The bead has a shiny appearance. This indicates overheating during welding.
7.) There is a misalignment of more than 10%in the thickness of the parts. This will occur when the centering of the pipe is incorrect, or the pipe has excessive ovality.
Conclusion
While both MIG and TIG welding applications are used successfully in seamless butt welding, TIG welding will get our vote for the best seamless butt welding. When TIG welding, the metals from the two pieces are fused together.
The weld is not totally hardened and can be easily sanded or grinded down giving a great finish to your seamless weld. While a MIG weld is harder than the parent metals, it may begin to show signs of cracking. TIG on the other hand should give you great durability.